
Installing & Configuring MonkeyPod's Ticket Tailor Integration
MonkeyPod's Ticket Tailor integration brings your ticket sales data into your MonkeyPod automatically. This means that purchasers' and attendees' relationship details are recorded along with the financial transactions, giving you a complete record of event participation in your MonkeyPod. This guide walks you through how to setup the Ticket Tailor integration.
What is Ticket Tailor? Ticket Tailor is an independent, flat-fee event ticketing and box-office platform that allows creators to easily sell tickets online. MonkeyPod offers an integration with this system. Learn more on the Ticket Tailor website.
Before you begin
Before you begin, you'll need three things in place:
- A Ticket Tailor box office. If you don't already have one, sign up at tickettailor.com. The MonkeyPod integration works with a single box office per MonkeyPod organization.
- A Stripe account connected to Ticket Tailor. Ticket Tailor uses third party systems to process payments. In order for MonkeyPod to record these transactions, you'll need to use Stripe as the Payment System for your Ticket Tailor account. Learn more by visiting the Ticket Tailor Help Centre. If you have already connected a Stripe account to MonkeyPod, it is ideal that you connect this account to Ticket Tailor as well.
- Admin access to Ticket Tailor, Stripe and MonkeyPod. You'll need admin access in order to copy an API key out of Ticket Tailor and Stripe and paste it into MonkeyPod, and you'll need to paste a webhook URL from MonkeyPod to Ticket Tailor. We'll cover these steps below, but you'll need to have admin access to these systems to get this done.
Setting up your Ticket Tailor connection
In MonkeyPod, choose Apps & Integrations > Ticketing > Ticket Tailor from the main menu. Choose the option to install Ticket Tailor and follow the on-screen steps for setup.
Once installed, Ticket Tailor appears as an option in MonkeyPod's Apps & Integrations menu.
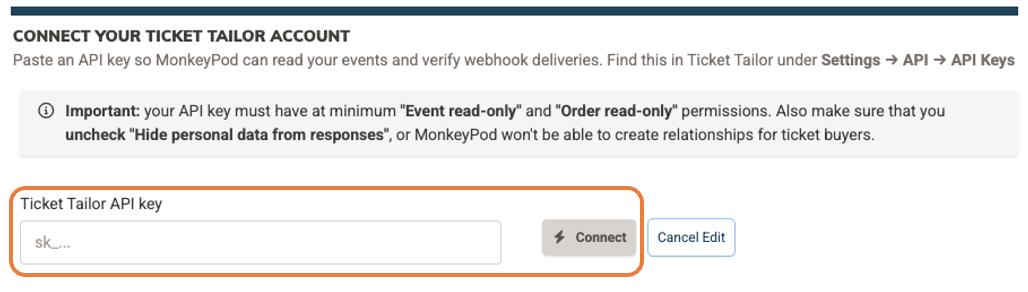
Step 1: Connect your Ticket Tailor Account using your Ticket Tailor API key
In Ticket Tailor, go to Settings → API and select the option to generate a new key. When prompted, choose the following options for the permitted roles:
- Select Event read-only and Order read-only
- Uncheck Hide personal data from responses (otherwise MonkeyPod can't see buyer names or emails.)
Once generated, the API key looks like sk_14802_313553_… . Copy and paste the key into MonkeyPod and click Connect. MonkeyPod will validate the key against Ticket Tailor before saving it.
Step 2: Add webhook subscriptions in Ticket Tailor
A webhook is an automatic notification that one app sends to another when something happens. In this case, whenever someone buys a ticket in Ticket Tailor, Ticket Tailor automatically sends that purchase information over to your MonkeyPod, so there's no manual importing or syncing required.
MonkeyPod displays a unique webhook URL for your connection. In your Ticket Tailor set up, click the copy button to copy the URL.
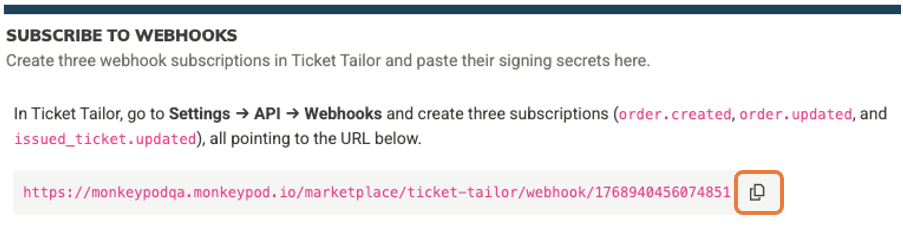
Next, in Ticket Tailor, go to Settings → API and select the Webhooks tab. There, create three new webhooks, pasting the same URL copied above into each:
order.created— required (this is how new sales reach MonkeyPod)order.updated— required (this is how refunds and cancellations reach MonkeyPod)issued_ticket.updated— optional but recommended (this is how check-ins and void notices reach MonkeyPod)
Next, show and copy the Ticket Tailor signing secret displayed on that same Webhooks tab in Ticket Tailor, and paste the signing secret back into the Ticket Tailor setup in your MonkeyPod. Select Save Secret.
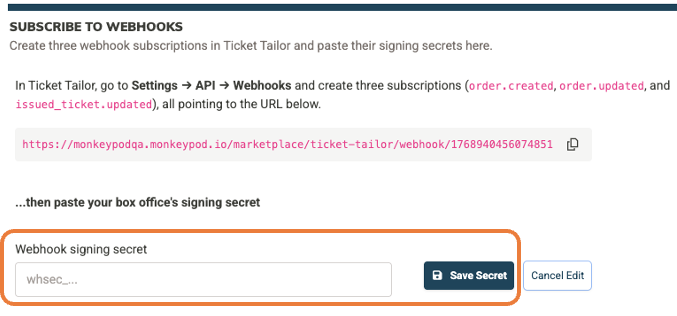
A signing secret is a private code that two apps share so they can trust each other. When Ticket Tailor sends information to your MonkeyPod, it includes this secret code as a way of proving the message is really coming from Ticket Tailor and not from somewhere else. Ticket Tailor uses a single signing secret per box office — all three subscriptions share the same secret, so you only paste it into MonkeyPod once.
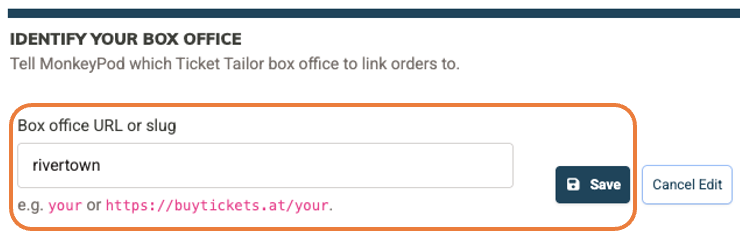
Step 3: Identify your box office by entering the box office URL or slug
Paste either your full Ticket Tailor box office URL (something like https://buytickets.at/yourorg ) or just the slug at the end (yourorg ) where prompted and click Save. MonkeyPod uses that to build helpful links back to Ticket Tailor from various locations in MonkeyPod.
Step 4: Set your defaults for recording Ticket Tailor information in your MonkeyPod
Pick the defaults MonkeyPod should use when it posts ticket sales or donations. These include the item, class, role, and account. You can revisit and change any of these from this same Setup tab at any time. Select Save Defaults when done.
- Item Required. The default item used to represent a ticket on every recorded ticket sale.
- Income/Expense Class Required. Used to classify every recorded sale or donation.
- Relationship role Optional. Use to assign a role to buyers and attendees
-
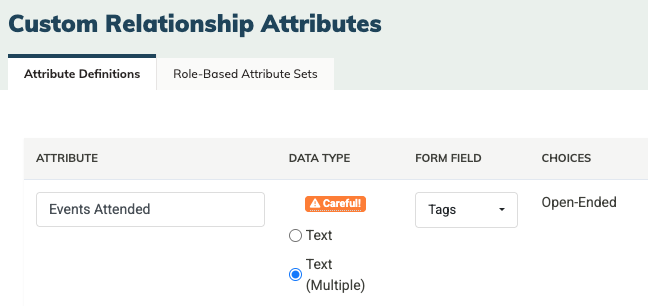
Custom Attribute for Tracking Event Attendance Optional. Each event automatically gets a tag created for it in your MonkeyPod, and those tags are always applied to sales and donations recorded by the app. Optionally, with this custom attribute for tracking event attendance you can specify a tag-based custom attribute to capture which events were attended by a given relationship. See How to Use Custom Attributes for details. (Note, this must be a custom attribute of type "Text (Multiple)" with "Tags" as the form field, as shown below. We recommend naming the custom attribute something like "Events Attended.")
- Cash/undeposited funds account Required. The account MonkeyPod should debit when an offline (cash / check / "pay at the door") order is marked as paid.
You can revisit any of the four setup steps anytime from the Setup tab in the dashboard.
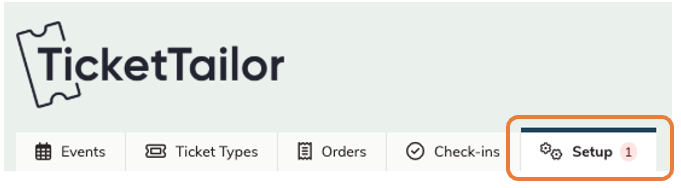
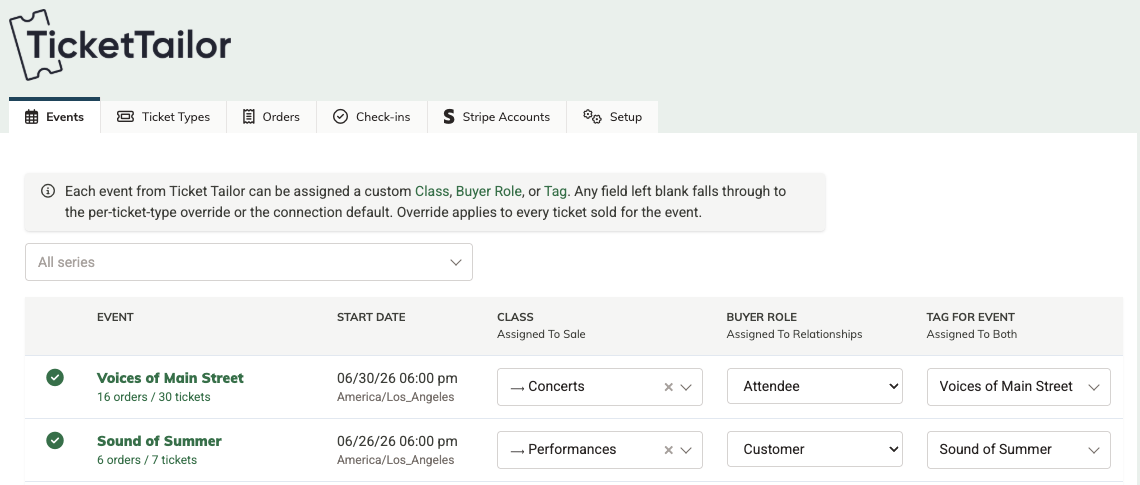
You can override the item, class, and role defaults for specific events or by ticket-types. To do so, go to the Events and Ticket Types tabs in the Ticket Tailor app. See How to customize classes, roles and tags for specific events.
Once you've finished the setup steps, your events will be displayed on the Events tab, and settings for ticket types are shown on the Ticket Types tab. View the Orders and Check-in tabs to monitor ticket purchases and check-ins as they come in (orders and check-ins that pre-date the app's installation are not recorded).
Setting up the Stripe Account
Ticket Tailor doesn't process payments itself — it relies on a third-party processor (most commonly Stripe). When your Ticket Tailor events use a Stripe account that you've also connected to MonkeyPod's Ticket Tailor integration, MonkeyPod can auto-record everything.
To add the Stripe account(s) used by Ticket Tailor:
Generate a read-only Stripe API key
- Login to Stripe and select the gear icon in the upper right corner to access your settings.
- Select Developers. Then, next to API keys, select Manage API keys.
- Select Create restricted key, then select “Providing the key to a third-party application.”
- Enter a name (something like MonkeyPod Ticket Tailor Integration). For the URL, enter https://www.monkeypod.io, and check the box for Customize permissions for this key. Then press Save.
- There are three permissions you need to look for, and all of them need to be set to “read” access:
- Charges
- Payment Intents
- Balance Transaction Sources
- Once you are sure those permissions are configured, scroll down to the bottom of the page, and select Create key.
- Copy that key.
If you need additional support, check out Stripe’s documentation.
Paste the generated Stripe API key into MonkeyPod's Ticket Tailor integration
- Select the Stripe Accounts tab in the Ticket Tailor integration and paste the Stripe API key that you copied above.
- Enter an optional label to help keep track of which account it is.
- Select Add Account to add that Stripe account and enable the automatic processing of orders in your MonkeyPod.
Important! If Ticket Tailor uses an account that is not included in the setup (including PayPal, or another processor) those orders will still be captured in MonkeyPod's Ticket Tailor integration, but you'll need to record the income transactions manually.
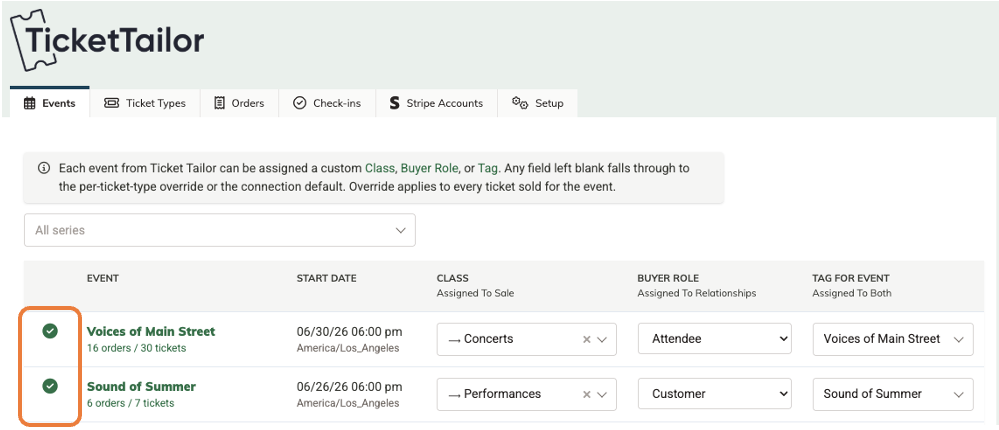
How to verify the setup before selling tickets
How to pause or disconnect the integration
Pausing your Ticket Tailor/MonkeyPod connection can be useful for short maintenance tasks or while you're reconfiguring and testing something in Ticket Tailor. Transactions that are made in Ticket Tailor while the connection is paused will not transfer to MonkeyPod when the connection is resumed.
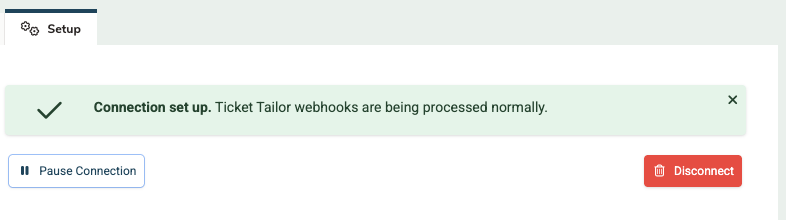
- Click Pause Connection on MonkeyPod's Ticket Tailor app's Setup page to pause the connection. While paused, MonkeyPod stops processing incoming webhooks but holds onto your connection settings so you can resume later.
- Click Resume to reenable the integration.
- Click Disconnect to remove your API key and webhook secrets entirely. Your historical transactions and data (sales, relationships, etc.) stays in MonkeyPod; only the live connection is removed (so your event data in the MonkeyPod's Ticket Tailor integration won't be visible. To reconnect later, reenter the API key and signing secret as described in the setup above.
Frequently Asked Questions
I got an email saying my Ticket Tailor connection has a problem. What happened?
This means that Ticket Tailor rejected MonkeyPod's last API call — usually because the API key has been revoked, the permissions were narrowed, or the "Hide personal data from responses" setting was re-enabled. Open the Ticket Tailor app in MonkeyPod and either re-paste the API key (after fixing the issue in Ticket Tailor) or generate a new key.
An order shows up as "Unrecorded" but I'm sure I have the right Stripe account connected.
Hover your mouse over the Unrecorded badge for the order to see if MonkeyPod provides specific details.
If that doesn't address the problem, open the order in Ticket Tailor and look at which event it's for. Then on that event's settings page, check the payment-method configuration. Ticket Tailor lets you override the payment method per event, so it's possible one specific event got pointed at a different Stripe account at some point. Fix it on that event, and future orders for it will auto-record.
I made a configuration change in Ticket Tailor but MonkeyPod still flags it as wrong.
Try reloading the Events tab in MonkeyPod's Ticket Tailor app. MonkeyPod caches Ticket Tailor's event data briefly; the cache refreshes within a few minutes.
I'm not seeing check-in data even though tickets have been scanned.
Check that you added the issued_ticket.updated webhook subscription in Ticket Tailor — it's optional and easy to miss during setup. The Check-ins tab shows a reminder if the report stays empty.
Can I use multiple Ticket Tailor box offices with one MonkeyPod organization?
Not currently. Each MonkeyPod organization connects to a single Ticket Tailor box office. If you need to manage multiple box offices, contact MonkeyPod support to discuss your specific situation.
Can MonkeyPod push data back into Ticket Tailor?
No — the integration is one-way. MonkeyPod reads from Ticket Tailor and reflects activity into your MonkeyPod records, but doesn't write anything back to Ticket Tailor. To make changes in Ticket Tailor (creating events, changing ticket types, refunding orders), use Ticket Tailor's own interface.
Where can I get more help?
Contact MonkeyPod support — we're happy to look at your specific setup and walk through anything that isn't working as expected. Use the orange beacon on this page, or email support@monkeypod.io.